
[WARNING: The following post is heavy on the details and light on the laughs. Sorry folks. I am feeling more instructional than comical today. Don't worry: I'm still a below average sewist who can't resist animated gifs in my storytelling.]
I started watching a lot of tutorials on YouTube about quilting techniques and so I wanted to try out some of the things I learned. I took a look in my stash (recently re-organized and neatly displayed during my sewing room makeover) to see if I could find the raw material for a quick baby-size quilt.

I also enlisted the help of my mini-me to do some critical wooden farm animal threading. She's not much of a conversationalist but pretty good company nonetheless.
Next I needed some pattern inspiration. I took a look at my Pinterest board to see if anything struck my fancy and I decided on this arrowhead pattern.
 |
| @babynelldesigns as Instagrammed -- if that's even a word -- by @artgalleryfabrics |

I had 8 different fabrics for the arrowheads, so I figured out I could only do 4 x 5 blocks because I wanted to do each color in a diagonal. Initially I thought I could do 5 x 6 but then I blocked out each color (chart on the right in the image above) and figured out I'd need more fabric patterns to do that/I'd need to repeat some.
Next I had to figure out how big each of the "blocks" were.
One arrowhead = 1 block = 4 squares/half square triangles.
Based on a baby quilt total size of 36" x 52", with 4 blocks on the 36" side and 5 blocks on the 52" side, I figured out I could do 9" blocks. This means the finished quilt size will be about 36" x 45", not 52" long.
[MISTAKE #1: As I'm typing this I realized I forgot to account for the .5" of seams for the blocks once they're sewn in, making each finished block 8.5" inches, NOT 9". I didn't really care too much how big this quilt was since it was just for funsies, so this doesn't really bother me.]
With 9" blocks, I needed the finished size of each of the 4 squares/half square triangles to be 4.5", which means each pre-sewn in square needed to be 5" to account for seams.

A half-square triangle, HST for short, can be made by taking two slightly larger squares, sewing them together as I'll show below, and then cutting them to make two HSTs. In order to do that, I needed each of the squares for the HST to be .5" bigger than the pre-sewn squares to account for the seams.
Now that I knew the size of the pieces I needed, I could figure out what I needed to cut. I made a handy chart below for each of the 8 colors. In my first sketch I had figured out that for each block of 4, I needed:
1 - white background square = 5"
1 - white background square to be made into 2 HST = 5.5"
1 - contrast square for the lower left corner of the arrowhead = 5"
1 - contrast square to be made into 2 HST = 5.5"
Since all of the background squares were white, I could just add up all of the blocks to figure out how many I needed. For the contrast fabrics, I used my first grid where I figured out how many blocks of each fabric I would need based on how long the diagonal was. Then I knew how many squares of each fabric I needed.
 |
| The left-most column is the number I used to indicate the different contrast fabrics in my initial grid. So 1 = contrast fabric 1. I should have used letters to distinguish this from the actual numbers. Bah. |

Here are the fabrics I used. I shuffled them around a few times on their "bolts" to find the most harmonious configuration. The pic above does not show the final order.
- Background fabric: my favorite white with metallic silver spots. I should figure out the name of this.
- Color 1 above: Sea waves with a fish tail
- Color 2: Mermaids
- Color 3: Zoo animals -- not strictly mystical but this is stash fabric so go with it
- Color 4: Unicorns!
- Color 5: Sheep. Basically mystical creatures.
- Color 6: Little gold hearts. I've always found the heart to be a mystical thing.
- Color 7: Stars. Nothing more mystical than the vastness of space.
- Not pictured: I added in a fabric that's navy blue with gold arrows.
Then I got to cutting.

Boom.

Next I drew diagonal lines on the larger white fabric squares. This was the guideline for the half-square triangles. I paired these up with the larger contrast fabric squares and then chain-sewed a quarter inch from the line on one side, flipped the whole chain around and sewed a quarter inch away from the line on the other side.

Then I sliced down the center of each and I had 2 HSTs! I ironed and ironed and then I had this:

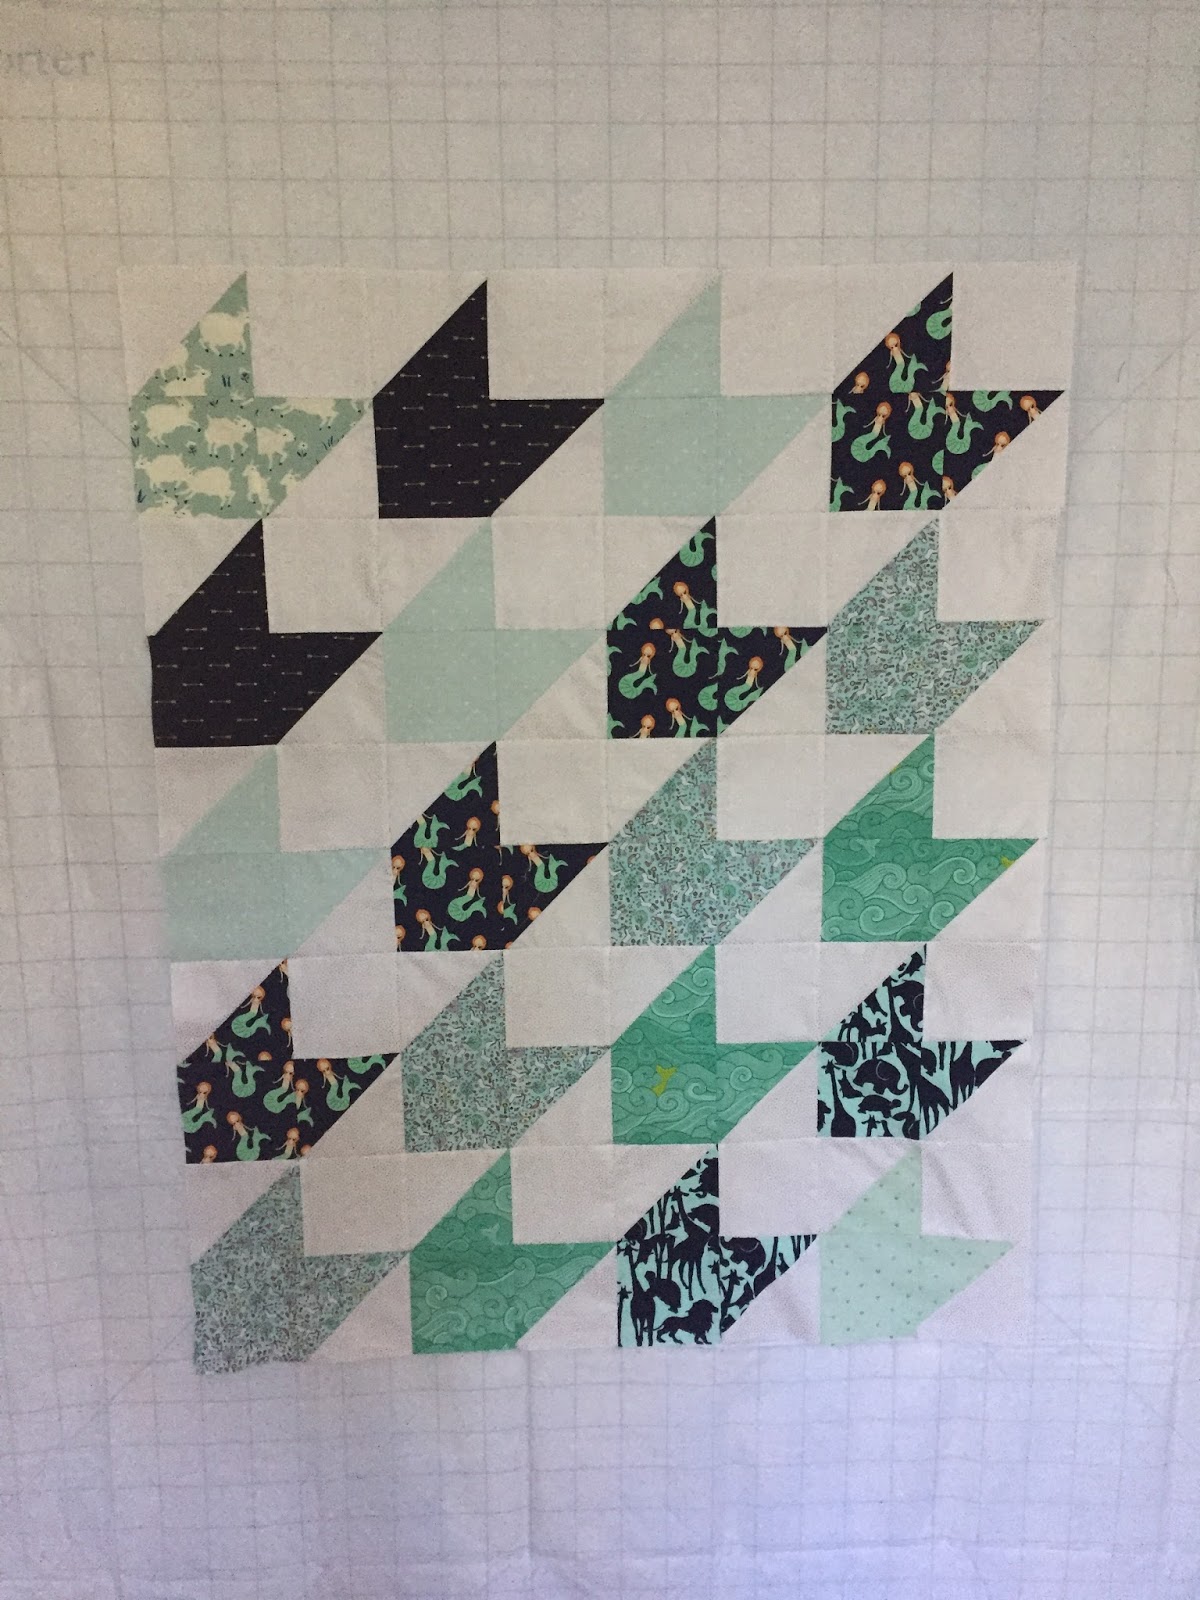
Next I put everything up on my design wall to see how it looked.
The fabric on it is super neat because the fabric just sticks to it when you give it a good smoosh with your hands. I'm sure there are some rules of science or something about why the fabric fibers hold onto each other like super light velcro, but I haven't taken a science class in 13 years so what do I know?

Next I used the chain piecing technique I recently learned...

...and very soon I had all my rows done! Having everything up on the design wall made this super easy and the chain piecing not only kept everything neat and in order, it also meant less thread clipping, resettling at the sewing machine, and forgetting where things went.

About an hour after I started piecing I had a finished and ironed quilt top! I think the whole quilt from start to finish took about 3 hours which is definitely a record for me. I think the first quilt I ever made took me about 3 months to finish cutting and piecing and another year or so to finish quilting. :)
But that's a story for another day.
Using the new things I learned, I not only accomplished this much faster (and with fewer errors) than I'm used to. It also looks the nicest! I was very consistent in my quarter-inch seams, and I even squared up my HSTs once they were sewed. I guess there's a reason you're supposed to do all of those things.
Another new thing: this is the first quilt I've made that is actually the same width at the top and bottom. When I line it up with the grid on my design wall is completely straight on all 4 sides.
Am I...improving?!?


No comments:
Post a Comment